Monday, November 22, 2010

Felt candy garland

I was browsing through a craft store a few weeks back.  I was hoping to be inspired for teacher Christmas gifts & just to be inspired.  I was feeling all hope was lost since I had roamed 80% of the store, until I saw a book that was all about felt projects.  Hmmmm.  I opened it up & saw these adorable candy felt swirls made into a garland.  I thought they were cute then left still feeling uninspired.  But I kept thinking about those silly things.  I tend to ramble so here's the rest, simplified.  I wanted to give it a try but have no idea the measurements they used or any of that jazz, just a pic in my head.  So here's what I came up with.


I think I'll make a few more & string them on my Christmas tree.  My husband says they look edible.  It made me smile, I'll take that as a compliment.

You'll need:

 I used plastic 6x9 round red & white beads,

3 squares of red felt, 3 of white, thin crochet thread (size 20), a 3" needle & long pins (sewing pins).

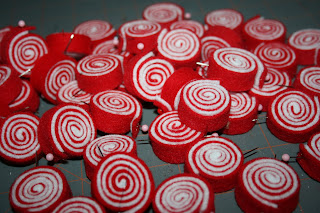
Cut strips of felt into 9" x 1/2"


Then place a white strip over a red strip & start rolling


keep rolling until you get to the end.  The white will be around 3/4" longer so I cut it so it was 1/8" - 1/4" shorter than the red

then pin all the way through to hold it together


Now set it aside & make 50 more.  I type that so casually :)

Cut a 12 foot strand of crochet thread (HOLY COW, that's long!)
  Tie a knot on one of your thread, just in case you need to anchor this garland.  On the other end thread the needle.

Thread a candy, then 5 beads, candy, 5 beads, candy, etc.  Make sure you don't unravel your candy swirl.  I either stuck the needle next to the pin, then took the pin out,or while securing the swirl took out the pin first then threaded it.

It will start to look like so

Once you have all 50 candies & beads on, it will be about 10 feet long.  I put a loop at the end too.


Now I'm going to play with measurements & make BIG candy swirls & make a custom garland for under my TV.  Ohhhh ahhhhhh!  I'll post pics if & when that fun thought happens!

Friday, November 19, 2010

Gratitude Journal

I was blog surfing the other day,(shocking I know!) and came across a great idea to have a family gratitude journal for Thanksgiving time. I decided that I wanted to make one for our family. Now that we live far away from both of our families I wanted to find things to fill our Thanksgiving Day. 

The idea of the journal is to pull it out on Thanksgiving and have everyone write in it what they are thankful for that year. I think the best part will be pulling in out in future years and reading about past years. 
Now to make this fun project I went to Hobby Lobby and found a great sketch book in the art section that has plain white paper in it. Then I found some cute fall paper and stickers. I came home and decoupaged the paper and stickers to the front of it. I think it turned out quite well! I can't wait to let the kids write, or draw what they are thankful for!
 I want to tie some cute fall ribbon on the spirals but haven't found any yet.
I decided to display it on my mantel with my other new fall decor I found on an 80% off sale at Hobby Lobby!  Gotta love the clearance sales!
I am grateful for so much this year that I might just fill the book myself!

Wednesday, November 17, 2010

zipper flower tutorial

I saw these adorable zipper flowers here.  Obvisouly I had to give them a try......

I opted for a 19" red zipper with plastic teeth (instead of metal)
Separate the zipper into two pieces.  I did a gathering stitch with my machine opposite the zipper as close to the edge as possible. 

I then gathered it & started forming a flower.  I hot glued as I went. 

 Since the back didn't look so pretty (hard to see in this horrible pic!) I cut out a round piece of matching felt & glued that to the back.

I do think I like the "pop" of the metal zipper though.  Hmmmmm, maybe for the next ones.

My indecision was in the button for the middle; clear, silver, red......


So I decided on the red.  Jill thought it looked 80's & liked the clear button & my 10 year old liked the clear too.  This cute red zipper flower currently has a clear button.  Oh how I wish I had my mother's button box.  I love that button box!  Although I think the flower would still have an undecided middle.

Jill tried this too & added little leaves, super cute!  C'mon Jill put your pic up!

Ok here you go...my version of the zipper flower. 

I did my stitch by hand and then gathered.  I stitched about half way between the zipper and the edge, which caused there to be less space between the zipper once gathered, did that make sense? I also only used a 9 inch zipper.

Sorry I forgot to take pictures as I went!  
I cut a leaf shape out of green ribbon and burned the edges to keep them from fraying.

I want to try it the way Kara did it and see how it looks.  I will post more pictures when I get it done!

You really should try this out it is quite fun and my 10 year old daughter LOVES to wear it!

Wednesday, November 10, 2010

Hair bow organizer tutorial

I have seen many of these things here & there.  But none really appealed to me.  I didn't want to paint, no wood involved & cheap & easy PLEASE.  So here is what I came up with.

 36" of 1 1/2" wide ribbon, 1 - 1 1/2" "D" ring, and the felt & button are optional.

 Wrap the ribbon under & over the flat side of the "D" hook & pin.

 Stitch across to secure the "D" ring there.  You can call it good & go hang it up & use it.  But I wanted to cute-ify mine, just a teeny bit.

I gave myself 30 minutes from start to finish for this project so I had a washer laying on my craft table & decided to trace that.  No time to look for another circle object to trace.

 I opted to cut it out with my new pinking sheers.  Why have I not had a pair of these ever before?!

 This is where I was in debate.....I decided to stitch the button on with green thread.  I should have taken the 2 minutes & gotten the embroidery floss out, I think that would have been chunkier & cutier.  Too late!  So after stitching it on I hot glued it to the ribbon up by the "D" ring.

 I ran the bottom of the ribbon across the flame to finish the edge

 Voila!

Much better than what I had before!

Friday, November 5, 2010

Elastic Zebra Scarf Tutorial

While at Disneyland last week I was inspired by a cute scarf they had for sale.  Their scarf was flannel & had 3 elastic stitches (length wise).  Simple, right?  So here's my version.


Ok let's get started......

I opted for a sheer zebra print that was kinda fuzzy.  Fabulously fun fabric is a must have!

I cut it 16" wide & 94" long.  I know it seems really long but the elastic will shrink it & maybe you want longer scarves to wrap around your neck a few times, or ten times (so it seems) in my case.

lay it right side up & fold one side in 4 1/4 inches.  Like so.  Fold the other side in, overlapping about 1/4 of an inch.  Then pin the bottom (short end).  With regular thread stitch a 1/2" seam.  What we're going to do is make nice edges once it's turned right side out.  Do the other end of the scarf.  Make sure the same side is the overlapper on both bottoms of the scarf.

You still with me?

Here's what it should look like after making your straight (non-elastic) stitch & before turning it right side out.  Ok, now turn it right side out & your going to pin the flaps closed.


You can barely see my yellow pin, but it's there.  Make sure & keep the 1/4" overlap so that when you sew right down the middle it closes up.

All pinned & ready to sew!  Like I said straight down the seam to close it up. 

Now let me talk a little about elastic thread.  I was a little intimidated & rightfully so.  I still don't have it perfected but let me tell you what I learned.  First off the elastic thread goes in the bobbin ONLY.  Very important (hence the bold letters).  I have been told to hand-wind the bobbin, so I did.  But wasn't happy, no gathering.  So I wound it like any other thread & what do you know.  I think it really depends on your machine.  I know & I hate to say it but..... it's a trial & error kinda thing. 

Here's what mine looked like after the first sew down.  Not hoe down, don't wander here, we're not quite done!

I wanted more ruffliness (I think I invented a word).  So I set my machine for longer stitches & did a second sew down the scarf.  Much better.

So what did we learn?  Maybe it needs 2 stitches or maybe the longer stitches are what did the trick.  Hmmmm, we may never know until I do the flannel one.  Which are my plans, I think.....soon.....maybe.

Let's look at it one more time, just because we can!

I've never seen my door knob look better, truly

Fabulously Yummy Gluten Free Chocolate Sheet Cake

Being Gluten free I miss a good cake!  
 I have always liked chocolate sheet cake but thought I would never be able to make a good gluten free one.  Alas I found this gluten free version of the Pioneer Woman's best chocolate sheet cake ever!  It truly lives up to its name!!!  
It really was not hard to make at all...well worth the effort


For those who are not gluten free you can use the same recipe just substitute the 3 kinds of flour for 2 cups regular all purpose flour and take out the xanthan gum. 


Best Gluten-Free Chocolate Cake. Ever adapted from The Pioneer Woman Cooks
For the Cake
Dry Ingredients
1 cup white rice flour
1/2 cup sweet rice flour
1/2 cup cornstarch
2 cups granulated sugar
1 teaspoon Baking Soda
1/4 teaspoons salt
1/8 teaspoons xanthan gum
Wet Ingredients
2 sticks butter
5 Tablespoons natural cocoa powder (yes, this is a wet ingredient.)
1 cup boiling water
1/2 cup buttermilk
2 large eggs
1 teaspoon vanilla extract
  1. Preheat oven to 350 degrees F. Grease a 12x18x1 pan with nonstick cooking spray. Set aside.
  2. In a large bowl, whisk together the dry ingredients. Set aside.
  3. In a medium saucepan, melt the butter over medium heat. Add cocoa powder and stir to combine.
  4. Reduce heat to low and allow mixture to cook for 3 minutes.
  5. Stir in boiling water and cook for 30 seconds.
  6. Remove from heat and allow to cool for 30 seconds.
  7. Pour mixture over dry ingredients. Stir to combine. (You can use a balloon whisk for this.) Blend until smooth.
  8. Add buttermilk, eggs, and vanilla, Mix until a batter forms.
  9. Pour batter evenly into prepared pan.
  10. Bake for 25 minutes or until cake springs back to the touch.
  11. Remove cake from the oven.
  12. Prepare icing. (Recipe below.)
  13. Pour icing over the warm cake.
For the Icing
Baker's note: Ree's recipe contains 1/2 cup finely chopped pecans. I am not a big fan of nuts neither are my kids, so, I've omitted them. If you like nuts, add them! Simply stir the nuts into the icing right before pouring it over the cake.
1 1/2 stick butter
5 tablespoons natural cocoa powder
3 1/2 cups powdered sugar
6 Tablespoons Milk
1 teaspoon vanilla extract
  1. In a large saucepan, melt the butter over medium heat.
  2. Add the cocoa powder. Stir to combine. Reduce heat to low. Add the powdered sugar, milk and vanilla extract. Using a whisk, mix until smooth and shiny. (If you are using nuts, add them now.)
  3. Pour evenly over warm cake.