Thursday, August 25, 2011

Fabulous cupcakes!


Now that school is back in I have time to share a few things that
I did BEFORE summer began.
These are gluten free - chocolate marshmallow topped cupcakes.
They were so yummy!
I found the recipe HERE. It is a very good gluten free blog, I actually bought her cookbook it all looked so good! I know it is gluten free but you could do the same thing with "normal" cupcakes. I will say they were a little messy, but if it isn't messy it isn't worth eating right?


Thursday, March 31, 2011

Sweet and Sour with an apology

Alright let me first say that we apologize for a lack of posts lately but we have been busy ladies.  I won't bore you with our excuses we will just move on.  We hope you like our revamping of our blog.  We were feeling that it looked a little drab for who we are.  If we could figure it out we would have a flashing neon sign for our blog header but we are just learning.  Maybe someday!

Alright so on to the sweet and sour part....

When I was first married I explored a lot of recipes and had a wide variety of meals.  It seems as though our meal plan has narrowed some and now I am lucky to get something more than cold cereal on the table.  One of the recipes that I used to make all the time and we loved was Sweet and Sour chicken .  It is quick and delicious!  So without further adieu...


Sweet and Sour Chicken/pork
1 can pineapple tidbits in juice
1/3 cup vinegar
3/4 cup water 
2 T. soy sauce
1/2 cup brown sugar
2 T. lemon juice
1/4-1/2 tsp. garlic powder
salt and pepper to taste
Chicken or pork cut into bite size pieces and cooked

Drain the pineapple, save the pineapple for later and put the juice into a medium sauce pan. Add the rest of the ingredients and bring to a boil.  In a small bowl mix 2 Tablespoons of cornstarch with a little water; add to sauce mixture.  Cook until thickened.  Add pineapple and desired meat.  You can also add green or red peppers and onion if desired.  I recently made this with fresh pineapple and red peppers.  It was DELICIOUS!  I had to buy just pineapple juice for the sauce but it was worth it!  I usually double the sauce for this recipe we like sauce, we are saucy people...lol!

Saturday, March 19, 2011

Rainbow cupcakes

I made these for St. Patrick's Day but still wanted to share the concept because they can be made for many occasions.  Not just St. Patty's Day.


My kids went crazy over them & it got me thinking.......  How fun to pick 2 or even 3 colors & layer those.  Pink & white or blue & white for a baby shower would be sooooo cute!  Or even red & blue for a Spider-man birthday party theme.  I could go on all day ladies......just planting little seeds of thought.  Just wait, you'll try to fit these into any upcoming occasion.  They're just that fun!

Like I said before I'm sharing a concept not a recipe.  Take a white cake mix & mix it up.  Separate the batter into 6 bowls.  Dye the batter whatever color you want in each bowl.  Then evenly distribute between 12 cupcake tins.  I won't lie, this is where I didn't know if this was worth it.  I was going crazy getting each color to cover completely over the other.  You can use the back of a spoon to help gently spread each color around.  And if you happen to have a Pampered Chef small scoop that will help tremendously because each color/layer is one small scoop per cupcake.

Tuesday, February 22, 2011

Hooded Bath Towel

My wonderful sister-in-law taught me how to make these fabulous hooded bath towels.  I have made them for my children and quite often for baby shower gifts.  They are fun and easy!
You will need - 
a full size towel
a hand towel the same color as the big towel
ribbon  - if you want to, not required 
thread to match towel

Ok so to start you will need to cut the hand towel in half.  You will only need half of it for one towel so I buy two of the same big towels and have one for the next time I need one.
Next I cut ribbon to the length needed to go across the hand towel.  You can have it wrap under the towel but it is hard to stitch it at the edges so I just turn it under on the front close tot he sides.  The edges will be covered when it is all done.  Sew the ribbon on, it is up to you where you put it on the towel.  I have used satin ribbon before and that is a lot harder to control, I prefer grosgrain ribbon.  I really like the look on 2 inch ribbon but only had on inch for this towel.  
Then I fold the finished edge of the hand towel under and sew along this edge.  You want to make sure that it doesn't overlap your ribbon so you don't have a stitch going through your cute ribbon.

Now fold the hand towel part in half so the ribbon is facing each other.  You are going to sew down the back, the cut part, of the hand towel.  Where you sew this will affect how deep the "hood" of your towel is.  You can adjust this to fit your child.  I usually sew in about an inch and a half from the cut edge.  This can vary depending on how long your hand towel was to start with.
Can you see my stitch?  After it is sewn I cut off the top corner so it will turn under nicely.
Tah Dah...the "hood".
Now to attach it to the towel.  Find the middle of the towel and lay the hood open to find it's middle.
Pin the two pieces together like so.
It should look like this when pinned.  Sew them together.  This is hard because of the thickness so have a strong needle.  I have broken several by not having strong ones.
The completed towel.  
I hope you understood this tutorial and I hope you try to make a hooded towel.  
They really are a lot of fun to make.

Friday, February 11, 2011

Valentine coupon book

I hope none of you are deceived by the post title.  This will not be a post about a place to find great coupons for your Valentine's dinner with the hubby.  Sorry.  But it's still a great idea, keep reading!

I was trying to think of what to get the kiddos that wasn't sugar or a stuffed animal (EVIL!) and came up with this idea.


They're little booklets with coupons.  Cute, right?!  I printed the coupons & their names on the computer, cut them out with fun scissors that I forgot I had & glued them to cardstock.  The hearts are puffy sparkly stickers & then tied them with ribbon.  So super easy!


The coupons are all different but include; a dessert date with Dad, game time with Mom or Dad, running an errand with Mom & getting a treat, staying up late, getting a free room cleaning from Mom, manicures (for the girls) & reading your favorite books with Dad or Mom (for the boys), 10 hugs & 10 "tootie" kisses, etc.  I did 8 coupons for each book/child but you can do more or less.  Obviously the idea of homemade coupon books is not a new concept.  They are usually made by the kids & given to the parents but what better way to show them service than by example?! 

You only have a few more days left so get a move on & have fun with it!

Tuesday, February 1, 2011

Yummy Nutritious Protein Balls

My friend, Sara, recently shared this recipe for protein balls with me and now my kids love to eat them! It is always hard to find something good for my gluten free kids to take in their lunches. This was a great solution to getting some protein in them. It is also a great after school snack! I can make a batch and keep them in the fridge for the week.


Here is the recipe for these healthy treats...

Protein Balls
1 cup protein powder - you can use vanilla or chocolate I used vanilla
1 cup honey
1 cup natural peanut butter - I didn't have natural so I used JIF I know bad!
Mix these three ingredients in a large bowl.
Then add
1 cup oatmeal ground - I buzzed it in my food processor
1 cup ground almonds -again zipped them in the food processor until almost a flour texture
1/2 cup mini chocolate chips
You can also add a little ground flax seed - don't add too much it makes them too dry - I added 2 T.
Mix it well, it might seem like it won't all come together but keep mixing.
When it is all mixed shape into balls and place on cookie sheet covered in wax paper.  Refrigerate until hard and then place in covered container.  Store in fridge.

Hope you try them and enjoy them.  I first sold them to my kids as cookie dough balls and after they liked them we now call them protein balls.  They really do taste like cookie dough.  My pickiest eater likes them the most.

Thursday, January 27, 2011

Sweet & Spicy Almonds

These can be summed up in one word:  Addicting!


2 1/2 c. whole almonds
1/4 C. white sugar
1 1/2 tsp. kosher salt
1 tsp. cayenne pepper
1 Tbs. water
1 Tbs. honey
1 tsp. olive oil

Preheat oven to 350 degrees.  Spread the almonds onto a baking sheet & toast until their golden & fragrant, about 10 minutes.  Be careful, they burn quickly.

Stir together the sugar, salt & cayenne pepper in a mixing bowl; set aside.

Stir together the water, honey & olive oil in a large skillet over medium heat.  Once the mixture begins to bubble, stir in the toasted almonds until evenly moistened.  Pour the almonds into the sugar/spice mixture & toss until evenly coated.  Spread onto a baking sheet in a single layer & cool.

Tuesday, January 25, 2011

How to love your tablecloths, again

I quite like tablecloths.  There are some very pretty, cute & sassy & classy looking tablecloths out there.  So my problem isn't with the tablecloth itself.  It's with what happens once that cute & sassy tablecloth lands on my table.  They get bunched up, they get pulled all to one side, they end up laying all caddy wompis on my table & I HATE that!  So I stopped using them many, many years ago.  Unless of course there was some fun & fancy function at my house.  Then I dealt with it for a few hours, giving it the evil eye the whole time.  Until now.  I have a great solution for all those tablecloth headaches. I'm telling you ladies this is so fabulous & it makes me smile just typing about it.  Now to give credit where credit is due this is my mother-in-laws fabulous idea, not mine.

Ok, grab that tablecloth & lay it on the table. 

Then measure all the sides to make sure everything is even.

 Then pinch the corner right up against the table & pin in a vertical line.  Then sew right along where the pins are.  In a vertical 3 inch line.  Am I making sense?

 The stitch line is to the very left of the blue tape.  I did such a good job matching my thread that you can't see the stitch - yay for me!  (Yes this is a different tablecloth.  I realized I should have a picture showing the stitch & used the tablecloth currently on my table)

And VOILA!  Your tablecloth not only will look lovely but will stay put.  And that ladies is a wonderful thing!

Saturday, January 22, 2011

Lemon poppy seed pancakes

Boy these were delicious so I have to share!


3/4 C. milk
1 Tbs. vinegar
1 Tbs. lemon juice
1 egg
2 Tbs. butter, melted
1/2 tsp. vanilla extract
1 C. all-purpose flour
2 Tbs. white sugar
1 tsp. baking powder
1/2 tsp. baking soda
1/2 tsp. salt
1 tsp. poppy seeds
1 tsp. lemon zest

Stir the milk, vinegar and lemon juice together in a small bowl; let stand 10 minutes to curdle.  Whisk in egg, butter and vanilla extract.

In a separate bowl, mix together the flour, sugar, baking powder, baking soda, salt, poppy seeds and lemon zest until well combined.  Pour the milk mixture into the flour mixture and whisk a few times until the batter is mostly free of lumps.

FYI/My 2 cents - This is a thicker pancake batter & cooks up nice & fluffy.  We only had regular maple syrup but I did have fresh blueberries & that was a wonderful addition.  I just love the combo of lemon & blueberries!  So for me I think next time I will use a blueberry preserve or blueberry syrup.  But of course I'd eat them just the same way I did again and again and again!

Friday, January 21, 2011

Less is more!

I got a text from my sister this morning.  She said she was having one of those days yesterday & couldn't fall asleep last night.  She rummaged through her books until she found the one I gave her by Emily Watts.   She said the book saved her day.  I was so thrilled she loved it as much as I do!  The book is called "Being the Mom: 10 coping strategies I learned by accident because I had children on purpose".  Actually Jill turned me on to this book a few years ago (I'll give credit where credit is due!).  I read it & loved it so much I bought it for my two "mommy" sisters one Mother's Day a few years back.

So what does that have to do with this post.  I immediately went to my bookcase, grabbed the book & read the introduction & the first chapter/strategy: "Instead of acquiring more things, use the things you have more creatively".  A great strategy of less is more.  She talks about these 2 capes.  A red one & a black one.  She sewed them & then for years they were used for batman, superman, little red riding hood, snow white, a zombie, a devil, a witch, etc.  She goes on to say that  things that have multiple uses are almost always more fun, cheaper & better than things with one specific use.  And then the paragraph that hit me....

"I have learned since the dog debacle (another example) that our possessions own us almost as fully as we own them.  Everything we bring into our homes and lives requires a little piece of our time and attention to care for it; to keep it clean, to store it or display it, to maintain its functionality.  So I think we need to be selective and choose to hang on to things that 'give back' in an emotional sense as much as they extract."
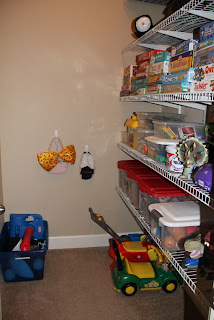
That got me thinking of the amount of stuff in my house.  Just stuff.  6 people worth of stuff.  Toys, games, clothes, books, plain ol' junk, etc.  But mostly toys.  I marched into the kitchen, grabbed a garbage bag, grabbed my new label maker from the office & peered inside the toy closet.

Yikes!

Less is more, right?  Honestly I have never been opposed to passing toys along or donating them.  And in my defense I did do a great giveaway before Christmas.  I swear these toys are multiplying on me!

To cut to the chase here is what a few hours worth of work can get you

Do you hear the hallelujah chorus too?!

I was happy to find a few missing pieces to some favorite games during the great clean up.

I love my new label maker!  I bought it to label all those silly cords in my office; cell phones, camcorder, laptops, digital cameras & apparently cords from 3 cell phones ago too.  Actually those didn't get labeled, they got the boot!

And here is the "headed to DI trailer" pile. 

Ahhh, it felt so nice to get that done.  Until I turned around & saw the mess the boys had made while I was busy.  That's beside the point, right?!  Now I think I'll take a week & apply this to the rest of my house before getting to strategy 2.